Radiant Floor Concrete Construction Slab on Grade (Single Pour):
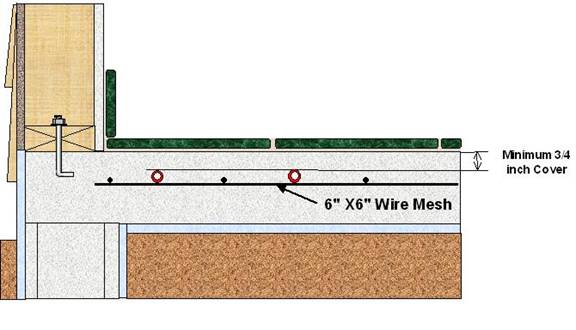
In this installation you are placing the radiant floor within a concrete pour that is placed directly on the soil or upon insulation that is placed directly on the soil. This is probably the most common application for radiant floors. Concrete slabs placed on the soil grade without radiant heating are uncomfortably cold as a result of their mass and the mass of the soil below. Placing the tubing in the slab permits the concrete to be heated to a very comfortable level.
Once the heat loss analysis, performance calculations and the tubing layout have been determined, you can begin to install the tubing matrix within the slab. Obviously, all insulation and final grading must be completed prior to the installation of the tubing.
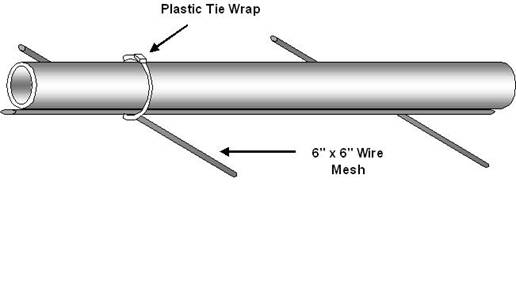
The easiest method of installing the tubing is to use 6-inch by 6-inch wire reinforcing mesh panels laid on the grade as a matrix upon which you install the pipe. There are two types of panels available; flat panels that are typically 4 feet wide and 8 feet long, and rolled panels that are 4 feet wide and come in much longer lengths. The flat panels are easier to install and lay down more evenly upon the soil. The roll panels can be difficult and even a bit dangerous to handle and need to be flattened in order to get them to lie down.
Place the 6” X 6” panels on top of the graded soil in a manner that allows you to use the grate as a quick reference for installing the tubing. Once the mesh is down, you can route the pipe along the grid according to the layout pattern you’ve selected. Fasten the tubing to the mesh using either a plastic tie wrap or a metal twist tie. You should fasten the pipe at intervals of not more than 18 inches. Also, it is a good idea to fasten the ends of the loops in the middle to keep them from floating up into the liquid concrete.
Normally the minimum unsupported bend radius is 6 times the outside Diameter. For half inch pipe that is a 3 ¾ inch radius or 7.5 inch diameter bend. If you are laying pipe at less than that interval, just let the loop splay out on the ends a bit and come back to a 6 inch interval on the straight part of the runs.
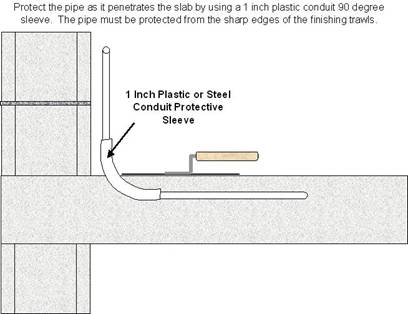
When you exit the slab with the pipe it is important to protect the pipe with either a metal or thick plastic sleeve. The best product for this purpose is an electrical conduit bend. Normally you will need a 1-inch bend for ½ inch nominal PEX pipe. The purpose of this protection is to guard against damage from the concrete finishing trawls that become very sharp with use.
It is a good idea to test the installation with pressure prior to the pour and to maintain air pressure on the pipe during the pour. Some of the concrete finishing tools and shovels that are used can be very sharp and possibly can damage the tubing. Loss of pressure and evidence of pressure escaping near the site of the damage would make identifying the problem and making the repair much easier.
Contractors should be warned not to damage the pipe.
WARNING: Pressure testing plastic pipe with air pressure can be dangerous due to the potential of explosive discharge of pressurized air. If possible, pressure test with water or a glycol mixture during periods where freeze is a potential.
Pressure testing flexible plastic pipe is somewhat different from pressure testing rigid pipe. At high pressure and during changing temperatures the pressure will fluctuate due to the expansion of the pipe. Therefore, loss of pressure on the gauge does not necessarily mean that there is a leak. The fact that the pipe holds pressure for a period of 12 hours is evidence enough that the pipe is not damaged.